Recording – Vocals

Setup

During week 9, we had the task of recording the main vocals for our song. To get a pure vocal recording with no interfering sounds (such as reverb) we made sure to have our vocalist, Zoe, perform in the dead room. The microphone we used was a AKG414. This condenser microphone is a good all-round mic that has a suitable frequency range to record vocals.

With the use of the foldback system, we got the levels set up so that Zoe was able to perform comfortably.

We also had to adjust her levels. We did this by having her sing along the song. While she was singing, we altered her gain so that the sound would not peak. However, while listening to her sing, peaking was still present along with a terrible popping sound. This sound is known as a plosion. Some consonants build up air pressure within the mouth. When that air is released, it hits the microphone and causes a harsh low frequency popping sound. It is most noticable when recording the letters P and T.

Instead of using a pop filter, we decided to alter the proximity and axis between Zoe and the microphone. Proximity is the distance between the vocalist and the microphone. When a microphone is too close to a vocalist, plosions may occur. But when a microphone is too far away, the lower frequencies may be lost. Axis is the angle at which the microphone is facing. The more a microphone is turned away from a vocalist, the thinner the sound becomes.mic place2

The image below shows the two lines of tape that represented where Zoe had been standing during the setup and recording process.

the lines3


The Recording Process

This week, we had Zoe sing along purely with our original recordings; we did not use the official song as a backing track. We took a few practice takes so that Zoe could figure out where to start singing in the song. Once she was ready, we began recording. There were short periods during the process when we decided to solo her vocal channel just so we could listen purely to her singing. We did this so that we could make sure there were no technical errors or mistakes being made.

Recording – Guitar

Setup

During week 8, we found ourselves recording one of the guitar parts. The setup used for recording an electric guitar was very similar to that when recording the bass guitar. The guitar was connected to a DI box which was used to split the signal sent from the guitar. One signal was sent through the wall and into the mixing desk so that we could record a clean sound on one channel. From the DI box, another signal was passed out into an amplifier. In order to record the sound of the guitar being amplified, we decided to place a microphone in front of the amplifier. The microphone was positioned halfway along the radius of the sound cone in order to capture the truest sound. Sound is refered to as ‘true’ when it best replicates what a person would hear as a live sound.

In order to record the sounds prodced from the guitar amplifer, we used a Shure SM57. This micrphone has it a mid frequency range and is quite sensative. These factors make it usefull for picking up the sound of a guitar.

Next, we setup the mixing desk. Through the use of foldback system, we made sure that our guitar player, James, was happy with the levels of the drums and bass that were being sent through to his headphones. We altered the foldback levels of each drum and the bass guitar until he found them comfortable to play along to. We also made sure that the signals from his guitar were successfully being sent into the mixing desk, ready for recording.


The Recording Process

During the recording process, James made a few minor instrumental errors. But this was nothing to worry about. Whenever a mistake was spotted, we simply stopped the song, rewound it and then played it from an agreed time before the error was made. Any error was then recorded over using the ‘punch in’ function.

By the end of the session, we only had one guitar part recorded. Sometime during the next few feeks, we will make sure to get one or two more guitar parts recorded. To make each part sound distinguishable, we will most likely have to experiment with the EQ settings. Once recorded, we could also add a variety of effects using to each part with the use of ProTools.

Recording – Bass

Setup

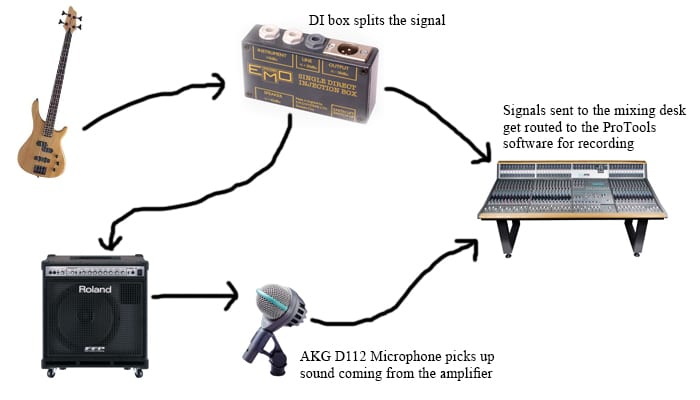
During week 7, we had to record the bass parts for our multitrack project. Our bass player, Zoe, was to play the bass within the live room. Her bass was connected to a DI box. The DI box allowed the signal to be split and sent in two directions. One signal went straight to the mixing desk. From the mixing desk, the signal could be sent to ProTools so that it may be recorded. This signal will be a clean recording of the bass guitar. The second signal was sent to an amplifier. An AKG D112 microphone was placed in front of the amplifier. The AKG D112 has a low frequency range, meaning it is well suited for picking up the sound of a bass guitar. Below this is a basic diagram of the setup so far.bass setup

The Microphone was placed so that it could pick up the truest sound. A sound is described as ‘true’ when it sounds most like how the human ear would hear it before being recorded. To get this true sound, the microphone was placed close up to the speaker, halfway accross the radius of the soundcone. A diagram of this microphone placement can be seen below.

mic place

Next we placed a microphone in front of Zoe and routed it to the mixing desk for talkback. We then made sure that Zoe could hear the backing track clearly and that she was comfortable with the levels of the individual tracks being sent to her headset. Once that was done, we made sure to set the levels of her bass on the mixing desk. Once they were set, we were ready to start recording.


The Recording Process

This week I have learned of a new recording technique. Instead of having Zoe repeat the song until we recorded a perfect take, we used a new function called ‘quick punch’. This recording tool within ProTools allows us to record over existing audio at any point of a take by quickly clicking on the record button. This allowed us to rewind takes and record over any mistakes that were made.

And that’s that. Two bass tracks were recorded by the end of te session. One was a clean take that could be edited and have plugins and effects added to it at a later date. The other was recorded with effects already set on an amplifier.

Recording – Drums

Hello there. I’m William Dutton and I’m writing here to record what has happened and what I have learned during the recording sessions that take place in my Multitrack Recording and Music Production module.

Last week, my group had their first recording session within the multitrack studio. The first instrument we had to record was the drum kit.


Microphone Setup

The bass drum was recorded using a dynamic mic with a large diaphragm (AKG D112) that was placed inside the drum. With the large diaphram, this mic was able to pick up frequencies as low as 35hz. A condensor mic could have also been placed about a meter or two away from the drum kit to record the sound of the drum and the acoustics of the room that the drum is placed in. This would have been pointless since we were recording the drums within the isolation room.

The rack tom was recording using an Audix D2. The floor tom was recorded using an Audix D4. The floor tom produces a lower sound than the rack tom. The Audix D4 was used on the floor tom as it could record lower frequencies than the D2.

Two microphones where used to record the snare drum since it gives off two different sounds from each head. Sound produced by the bottom head were slightly deeper than sound from the top head. An Audix D2 was used to record the top head and a ShureSM57 was used to record the bottom head.

Finally, we used three ADX51 microphones. One was used to record the high hat and the other two were used as overheads. These mics have a high frequency range of 40Hz to 18KHz. They can capture really high frequencies, hence why they were used on the high hat.


The Recording Process

Our original plan was to have the dummer play alongside a guitarist and singer so that he’d be able to keep track of where he was within the song. The drummer would have been playing in the isolation booth while the others where playing in the dead room. The sound of the other band members would reach the drummer’s headphones via te foldback system. The foldback system takes sounds that are picked up from one room into the mixing desk and directs them to outputs within other rooms. However, our band was underprepared and no one knew how to play the guitar parts.

Because of this, we decided to have the drummer play alongside the official song. The song was sent from a phone, through the mixing deskĀ  and into the isolation booth using the foldback system.

Before we started recording, we had to setup the levels and the foldback system. We made sure that the drummer was comfortable with the volume of the song and we also made sure that he could hear our voices through the talkback function. It’s important to have a way of communication between the producer and the instrumentalists as the producers may often need to ask to re-record parts of songs.

Next, we asked that the dummer play each drum separately so that we could set the level of each drum channel. Now we were able to begin recording.